Saturday 30 May 2015

Almond Tea Cake

Moist and delicious Tea time cake with ground almonds, Yogurt and topped with flaked almonds for a nice crunch. Perfect for afternoon Tea !


Ingredients

50 Grams Ground Almonds
3/4 Cup of All Purpose Flour
1 Teaspoon Baking Powder
1/2 Teaspoon Baking Soda
a big pinch of salt
1/2 Cup Unsalted butter at room temperature
1/2 Cup Castor Sugar
2 large eggs
½ Teaspoon Almond Extract
1/3 Cup Milk at room temperature

1/3 Cup Plain Natural Yogurt / Curd
For the Topping

1/4 Cup flaked and toasted almonds

Directions

1. Preheat the oven to 180 C. Grease and line a loaf pan and set aside
2. In a food processor, add 50 grams of almonds and pulse it couple of times until it is coarse powder. Do not over grind; over grinding almonds will result in oily almond paste. Coal is to pulse almonds j5 or 6 times just until they are powdered
3. In a large mixing bowl, add all purpose flour, baking powder, baking soda and salt. Mix everything
4. In a separate bowl, cream sugar and butter together until its creamy, smooth and white. I used a hand mixer to whip. You can use stand mixer or just a whisk
5. Then add one egg at a time and beat until it is mixed well in the sugar butter mixture
6. Add almond extract and beat once
7. Then add yogurt and beat it until the yogurt is incorporated in the mixture
8. Add flour mixture we prepared at step number 3 in 3 additions alternating with milk. And beat until the flour is mixed well in the wet ingredients
9. Finally fold in ground almonds ( from step number 2) in the cake batter
10. Pour the batter in the greased loaf pan and tap gently. Place flaked almonds all over the top of the cake batter
11. Bake at 180 C / 350 C for 35 to 40 minutes or until the skewer inserted comes out clean. Keep an eye after 25 minutes of baking. This cake tends to brown too quickly after 25 minutes. You might need to cover the top with aluminium foil after 25 minutes of baking to avoid burning at the top
12. Once out of the oven, cool slightly in the pan for 10 minutes. Then transfer it to a wire rack and cool completely
13. Slice the cake and top it with icing sugar and serve with Tea / Coffee

Thursday 28 May 2015

Sugar- Free Lassi

Cardamom and rose water flavored sweet Lassi with Sugar Substitute / Sugar free. Healthy and refreshing drink. Perfect for Summer !
 

Ingredients 

  • 1/2 Cup Yogurt / Curd ( I used homemade yogurt from full cream milk )
  • 1 Cup Ice cold water
  • 1 Green Cardamom pod
  • 1/2 Teaspoon Rose Water
  • a pinch of salt
  • 2 Packages of Stevia / Sugar Substitute 

Directions


1. In a blender add 2 tablespoons yogurt and cardamom pod. Blend it couple of times until the cardamom is powdered
2. Then add remaining yogurt, rose water, salt and blend it until smooth
3. Add cold water and blend it again until smooth and frothy. Adjust water according to the consistency your prefer
4. Stir in sugar substitute and serve immediately

Takeaway style Curry Base Gravy / Mother Sauce for Indian Butter Masala

Mother Sauce / Curry Base Gravy is a basic sauce that is the starting point for making various curry or gravy. This base gravy has onion and tomatoes as basic ingredients along with Indian spices. Oven Roasted onions and tomatoes are pureed and cooked in Butter. Then cooked in yogurt and spice powders.
 
Make this base gravy in large portions over the weekend. Then divide them into 4 or 5 portions in zip lock bags and freeze them. On a busy week night, when you are craving for some delicious curry to serve with bread / naan, this base gravy comes in handy. Thaw one of these zip lock bags for 20 minutes and then add Chicken / Paneer / Mushroom / Cauliflower / or your favourite veggies. Add cream / coconut milk for extra creaminess. You can serve a delicious, lip smacking curry in no time.
 
 Here , I have used base gravy for making "Mushroom butter masala".


Ingredients

  • 2 Tablespoon butter
  • 1 Tablespoon Vegetable oil
  • 1/2 Inch cinnamon Stick
  • 2 Bay leaves
  • 3 Cloves
  • 2 Green Cardamom
  • 1 large red onion chopped roughly
  • 1 inch Ginger chopped roughly
  • 5 Garlic Cloves
  • 2 Green Chillies
  • 2 Large ripe tomatoes quartered
  • 2 Tablespoon Tomato Paste
  • 2 Tablespoons Curd / Yogurt
  • 2 Tablespoon Coriander powder
  • 1 and 1/2 Teaspoon Kashmiri red chilli powder
  • 1/2 Teaspoon turmeric powder
  • Salt to taste
  • 1 Teaspoon Kasuri Methi / Dried Fenugreek Leaves

For the Mushroom butter masala

  • 1 Tablespoon salted butter
  • 1 pack of button mushrooms
  • 1/4 Cup Fresh Cream

Directions

1. In a baking tray , add roughly chopped onions, tomatoes and drizzle with 1 teaspoon of vegetable oil. Sprinkle a big pinch of salt
2. Preheat the oven to 210 C / 425 F. Place the baking tray with onions and tomatoes in the oven and roast until they have a nice char and golden. It took about 15 to 18 minutes. Toss them in between so that they get roasted evenly on all sides
3. Cool down completely
4. Add roasted onions in a food processor and grind it to fine paste. Set aside
5. Add roasted tomatoes in a food processor and grind it to paste /puree. Set aside
6. Add ginger and garlic in the processor and grind it to fine paste. Add 2 tablespoons of water to grind
7. In a pan / wok, add butter and oil. When the butter melts, add cinnamon stick, cloves, cardamom, bay leaves. Fry for 30 seconds
8. Then add ground onion paste and sprinkle a pinch of salt and fry on low flame for 10 minutes until oil starts leaving from the mixture and it turns light brown
9. Add ginger and garlic paste and fry for 10 minutes on low flame.
10. Add pureed tomato and fry until all water evaporates and oil starts to leave from the mixture
11. Add tomato paste and mix everything
12. Add coriander powder, red chilli powder and turmeric powder and add 1/4 cup of water
13. Bring it to boil and simmer. Let the mixture get thickened
14. Once all the water evaporates, add 1/4 cup more water and cook the gravy further until there is no water in the gravy and oil starts floating from the mixture
15. Add crushed kasuri methi and give it a sir. Season with salt
16. Switch off the flame and completely cool. At this stage , you can freeze the base gravy. Divide the gravy into 4 portions and fill them in freezer safe container / zip lock bags. Each portion of the base gravy will be sufficient to make 2 servings of the gravy. Freeze until further use
17. For Making Mushroom Butter masala from the base Gravy : Thaw the base gravy at kitchen top for 25 to 30 minutes.
18. In a pan, heat butter. When butter melts, add chopped button mushrooms. Sprinkle little salt and fry the mushrooms until they are nice golden
19. Add the base gravy and bring it to gentle boil
20. Add 1 Cup water and bring it to boil. Check seasoning and add more salt if required at this satge
21. Finally stir in fresh cream and let the gravy simmer for a minute. Switch off the flame
22. Serve hot with roti / naan / steamed rice


Monday 25 May 2015

Ven Pongal - South Indian Breakfast with rice and Lentils

Ingredients

Ven Pongal / Pongal is a staple South Indian breakfast with rice and lentils. Rice and yellow moong dal are pressure cooked in milk and water until they are mushy. Then the rice is topped with ginger, green chilli, pepper tempering and smothered generously with ghee. Served with coconut chutney and sambar. Pongal is delicious and filling breakfast that keeps you filled and satisfied for hours.


To Pressure cook Rice

  • 1 Cup Rice
  • 1/4 Cup Yellow Moong dal
  • 1/4 Teaspoon Salt
  • 3 Cups of water
  • 1 Cup of milk

For the tempering

  • 1 Tablespoon vegetable oil
  • 1 Tablespoon Ghee
  • 1/2 Teaspoon whole black peppercorns
  • 6 cashew nuts chopped roughly
  • 1/2 Teaspoon Fresh Ginger chopped fienly
  • 1/2 Teaspoon Cumin Seeds
  • 1 Green Chilli chopped finely
  • 1 Sprig of curry leaves
  • a big pinch of Hing / Asafoetida

Directions


1. Wash rice and dal together for 3 times and soak in regular tap water for 15 minutes
2. Add rice , dal , salt ,water and milk in a pressure cooker and pressure cook for 6 whistles on low flame
3. Once the pressure drops, open the lid of the pressure cooker and gently mash the rice with a back of a ladle
4. In a tadka pan / wok , heat oil and ghee
5. When the oil is hot, reduce the flame to low and add cumin seeds, whole black peppercorns and wait for them to splutter
6. Then add curry leaves, cashew nuts and fry until they are golden
7. Add ginger and green chillies and fry for 30 seconds
8. Finally add a big pinch of hing and give it a nice stir. Switch off the flame and add this tempering to the cooked rice and mix nicely
9. Serve hot immediately with coconut chutney and sambar


Coconut Milk Panna cotta with Mango chunks

Vegetarian version of panna cotta made with coconut cream, milk, cream and chin grass/ agar agar. It is smooth, silky and the combination of coconut milk with mango is heavenly. Topped with fresh mango slices these are the easiest and yummy dessert to make this summer.


Ingredients 

  • 1 Cup Coconut Cream / First extract of homemade coconut milk
  • 1/2 Cup Fresh Cream
  • 1 Cup Milk ( I used full cream milk)
  • 2/3 Cup of Sugar
  • 2 Teaspoons of China Grass or Agar Agar + 1/4 Cup water to dissolve
  • 1/2 Teaspoon Vanilla extract
  • 1/2 Cup sweet ripe mango chopped finely 

Directions 

1. If you are using fresh coconut , here is how you can extract coconut milk from the coconut. If you are using canned coconut cream , you can skip this step number one and go directly to step number 2.
Slice coconut in to thin pieces and then add them to a food processor / mixie and pulse it couple of times. Then add 1/4 cup warm water and grind it for a minute. Add 1/4 more water and process the coconut until there are no big chunks of coconut. Next filter this coconut milk through a sieve or tea filter to remove the coconut and extract only the milk from coconut.
2. In a sauce pan, combine milk , fresh cream and sugar and bring it to boil in medium flame. Switch off the flame
3. In a microwave safe mug, add 1/4 cup water and heat it to 40 seconds. Then add finely chopped / cut china grass in the hot water in the coffee mug and stir in. Let it sit in the water for 5 minutes
4. After 5 minutes, the china grass will become translucent. now pop the mug again in microwave and microwave on high for 1 minute
5. Using a spoon stir china grass in hot water until they dissolve completely
6. Add this dissolved china grass in the milk + cream mixture
7. Add vanilla extract and stir in
8. Add coconut cream and stir in
9. Pour this mixture in ramekins / serving bowls and top it with chopped mango
10. Transfer the mixture to fridge and refrigerate for 4 hours until they are set
11. Serve with few slices of mango and cherry on top
 

Sunday 24 May 2015

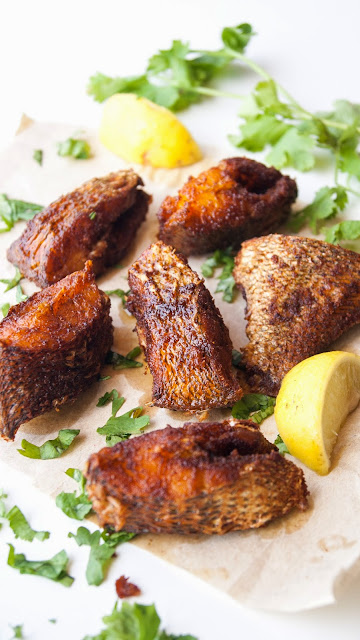
Kerala Style Pan fried Fish

 Kerala style Fish Fry - Fish fillets / pieces are coated with freshly ground aromatic spice rub and then pan fried. Easy to prepare and tastes delicious ! Best served with steamed rice and spicy fish Curry.


Ingredients

  • 500 grams Fish fillets / Fish Pieces cut into 1 inch lengthwise
  • 1/2 Inch Fresh Ginger Root
  • 4 Garlic Cloves
  • 8 Whole black peppercorns
  • 1 and 1/2 Teaspoon Red Chilli powder
  • 1/2 Teaspoon Turmeric powder
  • 1/2 teaspoon Cumin Powder
  • Juice of half lemon
  • Salt to taste
  • 3 Tablespoons of vegetable oil
  • Lemon wedges to serve
  • Chopped Cilantro leaves for garnish

Directions

1. In a food processor, add ginger , garlic, pepper corns, red chilli powder, turmeric powder , cumin powder. Add 2 Tablespoons of water and grind it to fine smooth paste
2. Transfer the paste to a bowl. Season with salt. Sprinkle Lemon Juice and stir in
3. Now add the fish fillets in the bowl and toss them gently to coat each fish fillets with masala on all sides
4. Set aside for 15 minutes
5. In a pan / tawa , heat oil. When the oil is hot, reduce the flame to medium
6. Place marinated fish pieces in the oil and pan fry until they are crispy and golden. Flip sides and fry on the other side too. I fried them in batches of 4 at a time.
7. Once they are nice golden, remove from oil and drain on paper towel
8. Serve hot with lemon wedges on the side and sprinkle cilantro leaves on top
 

Cinnamon Rolls with Vanilla Frosting

Soft, fluffy and light Cinnamon buns filled with gooey brown sugar cinnamon filling and topped with delicious vanilla glaze. These rolls are not too sweet and perfect for breakfast. I loved them plain, without vanilla frosting. However, you can pour generous frosting over the rolls and serve them warm with a cup of coffee.


Ingredients 

  • 2 and 1/4 Cup All purpose flour / Maida
  • 1/4 Teaspoon Baking Soda
  • 1/4 Teaspoon Baking Soda
  • 1/2 Teaspoon Salt 
  • 1/4 Cup warm water to proof yeast
  • 2 Teaspoons of active dry yeast ( I used Blue Bird brand)
  • 1 Tablespoon Granulated white Sugar 
  • 1/2 Cup Warm milk ( I used full cream)
  • 3 Tablespoons unsalted butter melted
  • 1/4 Cup milk to brush the rolls

For the filling 

  • 1/4 Cup Softened butter at room temperature
  • 1/2 Cup packed Brown Sugar
  • 1 Tablespoon Ground Cinnamon / Cinnamon powder
  • a big pinch of salt

For the Vanilla Glaze


  • 1 Cup powdered Sugar
  • 1/2 Teaspoon Vanilla extract
  • 1 Tablespoon melted Salted butter
  • 2 Tablespoons full cream milk
  • a pinch of salt

 Directions 

1. In a microwave safe mug heat 1/4 cup water for 20 seconds. Water should be just lukewarm to proof the yeast. Add 1 Tablespoon of sugar to the water and give it a stir. Then add 2 teaspoons of active dry yeast to the warm water and let it proof. The mixture will be frothy and bubbly in 10 minutes.

2. If the yeast doesn't proof, repeat step number one with a fresh packet of yeast. Do not proceed forward to the next step if your yeast is not proofing.

3. In a large mixing bowl, add 2 and 1/4 cups of all purpose flour, baking powder, baking soda and salt. Stir in yeast mixture and mix using a spatula or mix it with hands
 
4. Now, make a well in the center of the flour and pour warm milk, melted butter. Stir just until it is combined. This mixture will be slightly sticky. Now turn the dough on a surface and using hands knead the dough for 5 to 6 minutes until it comes together as a soft and non-sticky dough
 
5. Cover the dough with a kitchen towel and keep it in a warm place for an hour. I kept the dough in a preheated warm oven. Preheat the oven to 200 C for 5 minutes. Switch off the oven and keep the dough inside the warm oven for an hour. Keep the oven door slightly open to allow air from outside
 
6. After one hour, place the dough on a floured surface and roll the dough into a large thin rectangle
 
7. Using a pastry brush, brush 1/4 cup butter over the rolled dough leaving 1 inch space on the sides
 
8. Sprinkle cinnamon powder and brown sugar over the butter and spread them evenly
 
9 Roll the dough tightly starting from the farthest end from you to form a log. Pinch the seam side to keep the roll intact
 
10. Using a sharp knife cut the log 2 equal portions. Then cut these portions into 4 individual rolls. Totally you will have 8 cinnamon rolls.
 
11. Grease a 9 inch pan with butter and arrange the slices in a pan leaving space between each slices for them to grow. Keep them aside for 40 minutes and let them grow in size
 
12. Preheat the oven to 180C. Brush the rolls with milk and bake them at 180 C for 20 minutes until light golden
 
13. Meanwhile prepare the frosting: In a bowl, add powdered sugar. Whisk in butter, milk and vanilla until the mixture is smooth
 
14. Once the cinnamon rolls are out of the oven ,  immediately drizzle/ pour the frosting all over the rolls and let them cool completely in the pan
 
15. Cinnamon rolls are ready to be served and they taste even better the next day

Saturday 23 May 2015

Healthy Oats Porridge with Carrots and Green Peas

Healthy and tasty breakfast porridge with Oats , carrots and Green peas. Hint of cumin, ginger and garlic adds a nice flavor to the porridge. Top it off with grated parmesan cheese and onion greens and serve hot. Delicious and nutritious breakfast that keeps you filling and satisfied.  I find Carrots and green peas easy to cook and also , my kids favourite veggies. However, You can add your favourite veggies. 


Ingredients 

  • 1/2 Cup quick cooking Oats ( I used Quakers)
  • 1 Teaspoon vegetable oil
  • a pinch of cumin seeds
  • 1/2 Teaspoon finely chopped ginger
  • 1/2 Teaspoon finely chopped garlic
  • 1 Carrot chopped finely
  • 1/4 Cup Fresh Green Peas ( Thaw if frozen)
  • a pinch of turmeric powder
  • 1/4 Teaspoon Kashmiri red chilli powder / red chilli flakes
  • 1/2 Cup vegetable stock
  • 1/2 Cup Water
  • Salt to taste
  • Parmesan cheese to top ( optional)
  • 1 Tablespoon spring onion greens for garnish 

Directions 

1. In a pan / wok on medium heat, dry roast oats quickly for a minute stirring continuously until you smell fantastic aroma of oats. Remove Oats from pan and transfer it to a bowl and set aside
2. In the same pan, add oil. When the oil is hot, add cumin seeds. When they splutter, add chopped ginger and garlic and fry until garlic turns light golden ( about 45 seconds)
3. Then add carrots, green peas, turmeric powder, red chilli powder and give it a nice stir
4. Add 1/2 cup vegetable stock and season with a big pinch of salt. Make sure to check salt before adding more salt. Since we are adding veg stock, you might need very less salt
5. Cook the vegetable for 8 minutes until they are cooked through
6. Add 1/2 cup water and bring it to boil
7. Then add oats and keep stirring while you are adding oats
8. Let the oats cook for 2 to 3  minutes and let the porridge thicken to the required consistency
9. Add chopped spring onion greens and top it with grated parmesan cheese
10. Serve hot immediately.
 

Creamy Chicken Korma

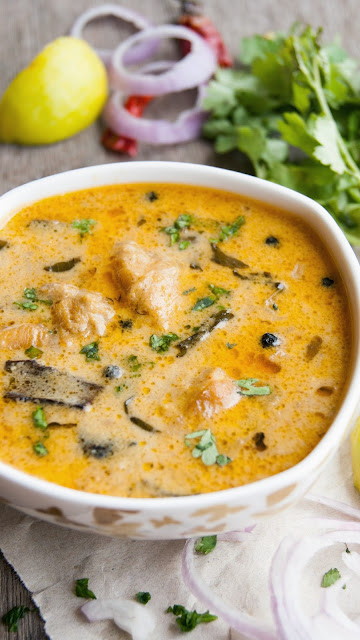
Mildly spiced, Rich, Creamy Chicken Korma inspired by the popular 'Food Safari - Afghan' Tv show. I slightly modified the recipe to suit my family needs.
 
This Korma is simple, easy to make and it is filled with delicious spices and creamy yogurt. Best served with lemon wedges and onion slices , sprinkled with lots of fresh cilantro leaves and Afghan Bread. I served this korma with homemade butter naan instead of Afghan bread. Delicious and heavenly food. Do try this korma and I am sure this will become your family favourite. It is Rich amd Creamyy!


Ingredients

  • 500 Grams of Chicken pieces
  • 3 Tablespoons of vegetable oil
  • 1 Bay leaf
  • 1/2 inch Cinnamon Stick
  • 1/2 Teaspoon Whole black peppercorns
  • 6 Fresh mint leaves
  • 1/2 Tablespoon fresh ginger root chopped finely
  • 1/2 Tablespoon crushed and then finely chopped Garlic
  • 1 Large onion chopped finely
  • 1/2 Cup thick Greek Yogurt / Plain Natural Yogurt / Curd
  • 1/2 Teaspoon Turmeric powder
  • 5 Dried plums / Alu Bhukara ( soak in hot water for 1 hour to re-hydrate them)
  • 1 Tomato chopped finely
  • 2 Green chillies chopped finely
  • 1/4 Cup Fresh Cream (original recipe did not use fresh cream. I added fresh cream for extra richness / creaminess)
  • Salt to taste
  • Lemon wedges and red onion rings for serving
  • Chopped cilantro leaves for Garnish

Directions

1. Heat oil in a heavy based pan /wok over high heat. when the oil is hot, add the chicken pieces and sprinkle a big pinch of salt and fry the chicken pieces for 8 to 10 minutes stirring continuously until they are nice golden
2. Remove the chicken pieces from the pan and set aside
3. In the remaining oil, add bay leaf, cinnamon stick, whole black peppercorns and fry for 30 seconds
4. Then add chopped ginger and garlic and fry for a minute until garlic turns light golden
5. Then add mint leaves and give it a quick stir
6. Add onions are reduce the flame to medium and fry the onions nicely until they turn golden
7. Reduce the heat to the lowest heat setting and add yogurt and turmeric powder
8. Keep stirring the yogurt mixture and bring it to boil
9. Now, return the chicken pieces to the pan. Give it a nice stir
10. Season with salt and close the pan with a lid
11. Let the chicken cook in yogurt based gravy for 15 minutes until the chicken is cooked through. Do not add water, chicken will start leaving water and it will get cooked in itself
12. Add dried plums, chopped tomatoes , green chillies and give it a nice stir and let it cook for 5 more minutes
13. Finally add fresh cream and give it nice stir. Let it cook for a minute and then switch off the flame
14. Serve hot with slices of onion , lemon wedges and your favourite bread.

Thursday 21 May 2015

Caramelized Plantains with Sweet Coconut Filling

Ripe Plantains stuffed with sweet coconut caramel filling and caramelized in ghee. Perfectly sweet, easy to make and quite satisfying and filling snack.


Ingredients

  • 2 Ripe Plantains
  • 1/2 Cup grated fresh coconut
  • 1/4 Cup Granulated white Sugar
  • 1/4 Cup Brown Sugar
  • 6 Cashew Nuts  broken into tiny pieces
  • 6 Raisins
  • a pinch of powdered cardamom
  • 1 Tablespoon Ghee

Directions

1. In a pan heat 1 Teaspoon Ghee. When the ghee melts, add cashew nuts and fry on low flame until they are nice golden
2. Add raisins and fry until they puff up. Remove nuts and raisins from the pan and transfer them to a bowl
3. Then add 2 tablespoons of granulated white sugar and brown sugar to the pan and add 1 tablespoon of water. Wait for the sugar to melt
4. Once the sugar starts melting, simmer and let the mixture thicken for a minute. Stir intermittently
5. Add grated coconut to the sugar and cook until the mixture comes together as thick and googy and sticky. Switch off the flame and cool the mixture. Add the fried cashew nuts and raisins and stir in
6. Using a knife remove both ends of the plantains and then remove the skin of plantains. Cut them into two equal portions lengthwise
7. In each portion of the plantain make a horizontal slit and gently scoop out plantain and make space for the coconut filling. Generously fill the space with coconut filling we prepared at step number 5
8. In a pan , heat remaining ghee. when the ghee melts, place stuffed plantains in the pan and fry them on medium flame until they are crispy and golden. Flip sides and fry on all sides
9. Sprinkle 2 tablespoons of granulated white sugar and toss and fry for one more minute until the sugar melts and plantains are caramelized
10. Switch off the flame and serve warm
 

Mint Chutney / Pudina Chutney for South Indian Breakfast

Mint flavored coconut chutney is an accompaniment / dip served with South Indian Breakfast dishes like Idly / Dosa. This chutney has mild mint flavor and it is spiced with green chillies and tempered with mustard seeds and curry leaves. Fried gram is added along with fresh coconut to give thick consistency to the chutney.


Yield : 2 Servings

Ingredients 

  • 1 Teaspoon Vegetable oil
  • 1/4 Cup tightly packed Mint leaves / Pudina
  • 1 Teaspoon Fried Gram / Bhuna Channa Dal / Pottukadalai
  • 2 Shallots / Sambar onion
  • 2 Tablespoon grated fresh coconut
  • 1 Green Chilli
  • a pinch of turmeric powder
  • a pinch of tamarind ( about a green pea size)
  • Salt to taste 

For the tempering

  • 1/2 Teaspoon vegetable oil
  • 1/2 Teaspoon mustard seeds
  • 1/2 Teaspoon urad dal
  • few curry leaves

Directions


1. Use fresh coconut for this chutney. You can either grate the fresh coconut or remove the brown hard core of the fresh coconut. We only need the white flesh of the coconut


2. Prepare the tempering first : In a wok/ kadai , heat 1/2 Teaspoon oil. When the oil is hot, add mustard seeds. When they splutter, add urad dal and fry until dal is light golden
3. Then add curry leaves and fry until curry leaves are crispy. Switch off the flame and transfer this tempering to the serving dish
4. In the same kadai / wok , add 1 teaspoon oil. When the oil is hot, add shallots and green chillies and fry for 30 seconds
5. Then add coconut slices , fried gram and pudina leaves , turmeric powder and fry for a minute on medium flame stirring constantly until the coconut has a nice golden char over the edges
6. Switch off the flame and let the ingredients cool completely
7. Then add the ingredients in a food processor / small mixie jar. Add tamarind
and grind it to fine paste by adding 3 tablespoons of water
8. Transfer the chutney to the serving dish and stir in to mix the tempering
9. Serve immediately with Idly / Dosa


Coconut Chutney for South Indian Breakfast

Coconut chutney is a popular accompaniment / dip served with South Indian Breakfast dishes like Idly / Dosa / Vada. It is spiced with green chillies and tempered with mustard seeds and curry leaves. Fried gram is added along with fresh coconut to give thick consistency to the chutney. However you can skip adding fried gram.


Ingredients

  • 1/2 Cup fresh coconut slices
  • 1 Tablespoon fried gram / Bhuna channa dal / Pottukadalai
  • 1 Green Chilli
  • a small fresh ginger piece ( about a green pea size)
  • Salt to taste

For the tempering

  • 1/2 Teaspoon vegetable oil
  • 1/2 Teaspoon mustard seeds
  • 1/2 Teaspoon urad dal
  • few curry leaves

Direction

1. Use fresh coconut for this chutney. You can either grate the fresh coconut or remove the brown hard core of the fresh coconut. We only need the white flesh of the coconut


2. In a food processor / small mixie jar, add coconut slices, fried gram, green chilli, ginger and pulse it couple of times


3. Then add 1 tablespoon of water and grind it until the coconut slices are mashed and there are no big chunks of coconut
4. Then add 2 more tablespoons of water and grind the chutney nicely until it is smooth paste
5. Transfer the chutney to the serving dish. Season with salt
6. In a small tadka pan / wok heat oil. When the oil is hot, add mustard seeds. When they splutter, add urad dal and fry until dal is light golden
7. Then add curry leaves and fry until curry leaves are crispy. Switch off the flame and immediately pour the tempering / tadka ( along with the oil ) over the prepared chutney and give it a nice stir
8. Serve with Idly / Dosa / Vada

Wednesday 20 May 2015

Paneer Ghee Roast

For all the Paneer lovers, this one is for you ! Paneer coated with a freshly ground "Aromatic spicy coastal style masala" and then pan seared in pure ghee. Ghee Roast is a delicacy from Coastal Karnataka region and mostly prepared with Chicken and Prawn. I tried using the same masala to coat paneer and fry them in ghee, the result was delicious tasting crispy paneer with soft juicy center. These paneer slices were spicy, slightly tangy, super soft from inside and that masala was yum !


Ingredients

  • 200 Grams Paneer cut into cubes or triangles
  • 2 Tablespoons Ghee
  • One sprig of Curry leaf
  • Chopped cilantro leaves for Garnish
  • Salt to taste

For dry roasting

  • 2 Kashmiri chillies
  • 2 Byadagi Red chillies
  • 1/2 Teaspoon whole black pepper corns
  • 1/2 Tablespoon coriander seeds
  • 1/4 Teaspoon cumin seeds
  • 1/4 Teaspoon fenugreek seeds
  • 4 Garlic Cloves
  • a big pinch of tamarind ( about a green pea size )

Directions

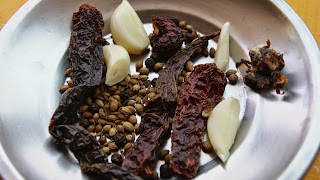
1. In a frying pan, add coriander seeds, cumin seeds, fenugreek seeds, black pepper corns and dry roast until you smell the nice aroma of the spices (about a minute) . Finally add red chillies (both Kashmiri and Byadagi ) and roast for few seconds. Switch off the flame and cool completely

2. In a spice grinder add all the dry roasted ingredients along with 4 garlic cloves, tamarind and  grind it to fine paste using 1 or 2 tablespoon of water. Season this spice paste with salt


3. Apply this chilli spice paste on the paneer pieces and set aside for 10 minutes


4. In a tawa / non-stick pan heat ghee. When the ghee starts melting, add curry leaves and fry until they are crispy. Then gently place the spice coated paneer triangles on the tawa and fry on medium flame until they are nice golden. Flip side and fry on the other side too.

5. Remove the pan roasted paneer from the pan and drain excess oil in a paper towel.

6. Garnish with chopped cilantro leaves and serve hot with your favourite dip.
 

Sunday 17 May 2015

Hot Milk Cake

Old Fashioned hot milk Vanilla cake is light, fluffy, soft and it literally melts in your mouth. This cake is super moist and very easy to make. In this recipe, eggs are whipped until they triple in volume in order to produce lots of air bubbles. The more air bubbles we beat in, the lighter and fluffier your cake will be. Also, in hot milk cake recipe, instead of creaming butter and sugar, we are whipping eggs and sugar. This is the first time ever I tried hot milk cake and I am surprised at how light and fluffy this cake is !

I served it plain with evening tea. You can serve it with whipped cream and fresh seasonal fruits.


Recipe Adapted From : http://www.bakingisascience.com/hotmilk-cake/

Ingredients

  • 1 Cup All purpose Flour
  • 2 Tablespoon Corn Starch
  • 1 Teaspoon Baking Powder
  • 1/2 Teaspoon Salt
  • 2 Large eggs at room temperature
  • 1 Cup Granulated white sugar
  • 1/2 Teaspoon Vanilla extract
  • 1/2 Cups plus 2 tablespoon milk
  • 2 tablespoons unsalted butter

Directions

1. Grease a loaf pan with butter and set aside. Preheat oven to 180 C / 350 F
2. In a large mixing bowl, add 2 eggs and beat using a hand mixer for 3 minutes until they turn thick and nice yellow color
3. Now add sugar in 2 addition and beat until the mixture is light and fluffy
4. In a separate mixing bowl, add 1 cup all purpose flour. Remove 2 tablespoons of flour from the bowl and discard. Now add 2 tablespoon of corn starch. Original recipe uses cake flour. Since I did not have cake flour, I used all purpose flour and corn starch as substitute. If you are using cake flour , use 1 cup of cake flour.  ie. 1 Cup of cake flour  = 1 Cup minus 2 tablespoons of all purpose flour + 2 tablespoons of corn starch
5. Add baking powder, salt to the flour and mix
6. Add this flour mixture in 3 additions to the egg sugar mixture and beat until just combined
7. Add vanilla extract and stir in
8. In a small sauce pan, add milk and butter and heat the milk just until the butter melts. Do not boil milk or over heat
9. Now add milk butter mixture in the mixing bowl in steady stream and beat just until it is combined
10. Pour the batter in the greased loaf pan and bake for 40 minutes at 180 C or until the tooth pick inserted comes out clean
11. Cool the cake in the pan for 10 minutes, then transfer it to a wire rack and cool completely
12. Slice and serve with whipped cream and fruits or just plain with tea / coffee

Saturday 16 May 2015

Eeral / Mutton Liver Masala

Mutton liver cooked with shallots in green chilli and cilantro paste. This liver masala is spicy and delicious. Serve as a side with Biryani or with steamed rice and mutton Gravy.


Ingredients

To Pressure Cook

  • 300 Grams Mutton Liver
  • 1/2 Teaspoon red chilli powder
  • 1/4 Teaspoon Turmeric powder
  • a big pinch of salt
  • 1/2 Cup water

To Grind

  • 1/4  Cup Shallots
  • 2 Green Chillies
  • 1/4 Cup tightly packed cilantro leaves
  • 1/2 Teaspoon cumin seeds
  • 1/2 Teaspoon fennel seeds
  • 1/2 Teaspoon whole black peppercorns
  • 6 Garlic cloves
  • 1 inch fresh ginger piece
  • 1/2 Teaspoon salt


For the Masala

  • 3 Tablespoon sesame oil / gingelly oil
  • 1/2 Cup shallots chopped finely
  • 2 Sprigs of curry leaves
  • 1 and 1/2 Tablespoon coriander powder
  • 1 Teaspoon red chilli powder
  • Salt to taste
  • Juice of 1/2 Lemon to drizzle before serving
  • Lemon wedges to serve
  • Chopped cilantro leaves for garnish

Directions


1. In a pressure cooker add mutton liver cubes along with the list of ingredients listed under 'To pressure cook' and pressure cook the liver for 2 whistles on medium flame
2. Once the pressure settles down, open the cooker and cut the liver further into tiny / very small pieces. Retain the liver stock / the remaining water in the cooker. We will be adding this water/stock to the masala


3. In a food processor/ mixie jar add all the ingredients listed under 'To Grind' and grind it to fine paste. Add little water / no water while grinding. I did not add water while grinding


4. In a wok / kadai, heat oil. When the oil is hot, add curry leaves and fry until they are crispy

5. Then add the green paste we prepared at step number 3 in the oil and reduce the flame to low


6. Sprinkle 1/4 Teaspoon salt and let the green masala cook nicely until all the water from the green paste evaporates. You need to stir intermittently to avoid burning the masala at the bottom of the pan.
7. Add 1/4 cup liver stock from the pressure cooker to the pan and cook the masala again until all the water evaporates and the masala turns from green to brownish black / dark color. This step is very important, you need to fry the masala on low flame until it becomes dry and changes color. Other wise you will end up with raw ginger garlic smell in the liver.


8. Add shallots and fry until shallots are soft


9. Add coriander powder, red chilli powder and 1/4 cup of liver stock from the pressure cooker and cook until the stock evaporates
10. At this stage, add the liver pieces along with the remaining stock


11. Cook on medium flame until the liver masala reaches the required consistency
12. Squeeze juice of 1/2 lemon before serving and serve with lemon wedges and sprinkle chopped cilantro leaves
 

Friday 15 May 2015

Garlic Tomato Chutney/ Dip

An easy to make flavor packed chutney/ Dip with garlic, tomato and shallots. It is one of my favourite dip to serve with bread / Roti. This chutney stays well for 2 days at room temperature and hence can be packed for travel / picnic / make ahead for parties. Best served with Roti / bread. Other serving suggestions are with chips, crackers, cutlets, nachos, or over steamed rice.


Ingredients

  • 1 and 1/2  Tablespoon unsalted butter ( you can use vegetable oil instead of butter)
  • 1/2 Teaspoon cumin seeds
  • 3 Garlic cloves crushed and chopped
  • 1/2 Cup shallots chopped finely
  • 2 Large ripe tomatoes pureed in food processor
  • 1 Teaspoon granulated white sugar
  • 1/2 Teaspoon red chilli powder / paprika
  • 1/4 Teaspoon Turmeric powder
  • Salt to taste
  • Freshly ground black pepper to taste

Directions


1. In a pan on low flame melt butter. When the butter melts, add cumin seeds and let them splutter
2. Add crushed garlic cloves and fry until they turn light golden
3. Add shallots and fry on low flame until they are soft and has a nice char on the edges and little crispy
4. Then add pureed tomatoes and sprinkle 1 teaspoon sugar and let the tomatoes cook for 10 minutes until they the water evaporates from the tomatoes and the mixture is dry
5. Add red chilli powder, turmeric powder and 1/4 cup water and let the chutney cook for 5 minutes. Stir intermittently
6. After 5 minutes of cooking or when the water evaporates, add 1/4 cup more water and let the chutney cook further 5 minutes until the water evaporates. This process of " adding water, cooking chutney until the water evaporates and then again adding water"  gives this chutney a nice tangy, sweet taste
7. Finally season with salt and ground pepper. It is very important to season with salt only at the last step. Otherwise the tomato puree reduces considerably in quantity in the process of cooking and the chutney turns very salty if you add the salt initially in the cooking process.
8. Switch off the flame and serve hot with your favourite bread / dosa / flavoured rice
 

Cheesy Spinach and Broccoli Bites

Broccoli and spinach bites are super crispy, perfectly seasoned and loaded with greens and cheese. A hearty and healthy way to include greens. Best served as an appetizer / finger food along with ketchup or green chutney / your favourite dip. These are also good as burgers inside bun/ pita bread / naan.


Ingredients

  • 1 Large potato boiled and mashed
  • 1 and 1/2 Cup Broccoli Florets
  • 1/2 Cup Fresh Spinach ( I used fresh Palak )
  • 1/2 Cup Bread crumbs ( I used homemade bread crumbs from whole wheat sandwich breads)
  • 1/3 Cup grated Cheddar Cheese ( I used milky way cheddar cheese)
  • 1 Tablespoon chopped cilantro leaves
  • 1 and 1/2 Tablespoon vegetable oil to shallow fry

Seasoning

  • 1/2 Teaspoon mixed dried herbs ( mix of dried thyme, rosemary and oregano)
  • 1/2 Teaspoon red chilli flakes
  • 1/2 Teaspoon freshly ground black pepper
  • 1/2 Teaspoon red chilli powder
  • Salt

Directions

1. Blanch broccoli and spinach : In a sauce pan bring water to boil. Season the water with a big pinch of salt. Add spinach leaves and blanch them quickly in hot water for a minute. Remove spinach leaves and squeeze excess water from spinach. 

2. Add broccoli florets to the boiling water in the sauce pan and let them cook for 2 minutes. Remove them from hot water and shock them in ice cold water. Once they cool little bit, roughly chop broccoli florets into tiny florets / pieces

3. In a large bowl, add mashed potatoes, chopped spinach, broccoli florets, bread crumb, Cheese, cilantro leaves. Add all the seasoning listed under 'Seasoning'


4. Using hands mix everything together gently without breaking/ mashing the broccoli florets
6. Pinch 1 and 1/2 tablespoon of this mixture and roll them into balls. Gently flatten each ball and form patties. Set aside
7. In a pan / skillet heat oil. When the oil is hot, reduce the flame to medium and place the patties in the oil. I placed 6 patties in the pan once and shallow fried them both sides until they are crispy and golden
8. Once they are crispy, remove from oil and place them on a paper towel. Place one more paper towel over the cutlets and using a spatula press the paper towel over the cutlets to remove excess oil
9. Serve hot with ketchup or green chutney